Disclosure: As a reader-supported blog, some of the links in our posts are affiliate links, and if you go through them to make a purchase we may earn a commission. This doesn’t cost you anything extra, but it does help us keep the site up and running with quality content. Thank you for your support!
Efficiently managing your schedule is crucial for productivity. By integrating Google Calendar with Notion, you can create a powerful system for organizing your events, automating repetitive tasks, and streamlining your work and personal life.
Table of Contents
Why Combine Google Calendar and Notion?
Integrating Google Calendar with Notion offers several advantages:
- Flexibility: Notion allows you to customize databases and templates to suit your specific scheduling needs.
- Collaboration: Notion’s collaborative features make it an excellent tool for team calendars and shared events.
Embedding a Static Google Calendar in Notion
Sometimes, you may prefer to have a static view of your Google Calendar directly within a Notion page for quick reference. While this won’t offer real-time updates, it can be a handy way to visualize your schedule. Here’s how to embed a static Google Calendar:
- Open Google Calendar:
- Go to your Google Calendar and ensure you’re logged into the Google account associated with your calendar.
- Select Calendar to Share:
- On the left-hand side, under “My calendars,” locate the calendar you want to embed.
- Access Calendar Settings:
- Click the three dots (More options) next to the calendar’s name and select “Settings and sharing.”
- Generate the Embed Code:
- Scroll down to the “Integrate calendar” section.
- In the “Embed code” section, you’ll find the calendar URL necessary for embedding the calendar.
- Make sure your calendar is set to be publicly accessible
- Copy the Embed URL:
- Copy the generated URL.
- Embed in Notion:
- Return to your Notion workspace and open the page where you want to embed the calendar.
- Paste the URL and the options menu should pop up. Select “Create embed”
- View the Embedded Calendar:
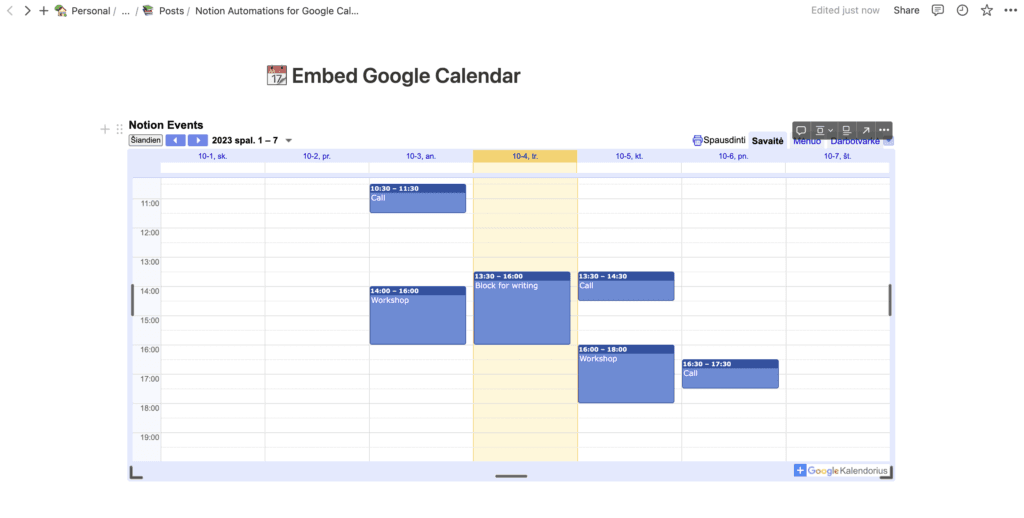
- Your Google Calendar should now be visible on your Notion page. You can resize the block to fit your layout.

Remember that this is a static view of your Google Calendar, so it won’t update in real-time. However, it provides a visual reference to your schedule directly within your Notion workspace.
Setting Up Google Calendar Integration with Notion
While Notion doesn’t have a direct integration with Google Calendar, a connection can be established using third-party services. In this tutorial, we’ll explore integration using the Make platform, but before we begin, some preparations in Notion are necessary. Alternatively, if you prefer not to use the Make platform or would like to avoid setting up things yourself, you can opt for a specialized service called 2sync. This service is designed specifically for seamless integration between Notion and Google Calendar, offering a convenient and user-friendly alternative.
- Create a Notion Calendar Database:
- Start by creating an empty page in Notion, wherever suits you best.
- Type “/” and search for “Calendar view.” Choose it.
- If you already have a data source, select it; otherwise, create a new database.
- Now, you’ll see an empty calendar view ready to be filled with events.
- Manually Add an Event:
- Hover over a date and click the “+” sign.
- A modal window will appear. Fill in the event’s title, date, and time. Add any extra properties you need.
- Your event will now appear on your Notion calendar.
- Prepare Notion for Integration:
- Navigate to Notion’s “Settings & Members” section.
- In the sidebar, select “Connections” and then “Develop or manage integrations.”
- Create a new integration by clicking “+ New Integration”:
- Select your workspace and give it a name.
- In the “Capabilities” section, enable full comment capabilities and read user information access.
- Note down the “Internal Integration Secret” for later use.
- Add the Integration to Your Workspace:
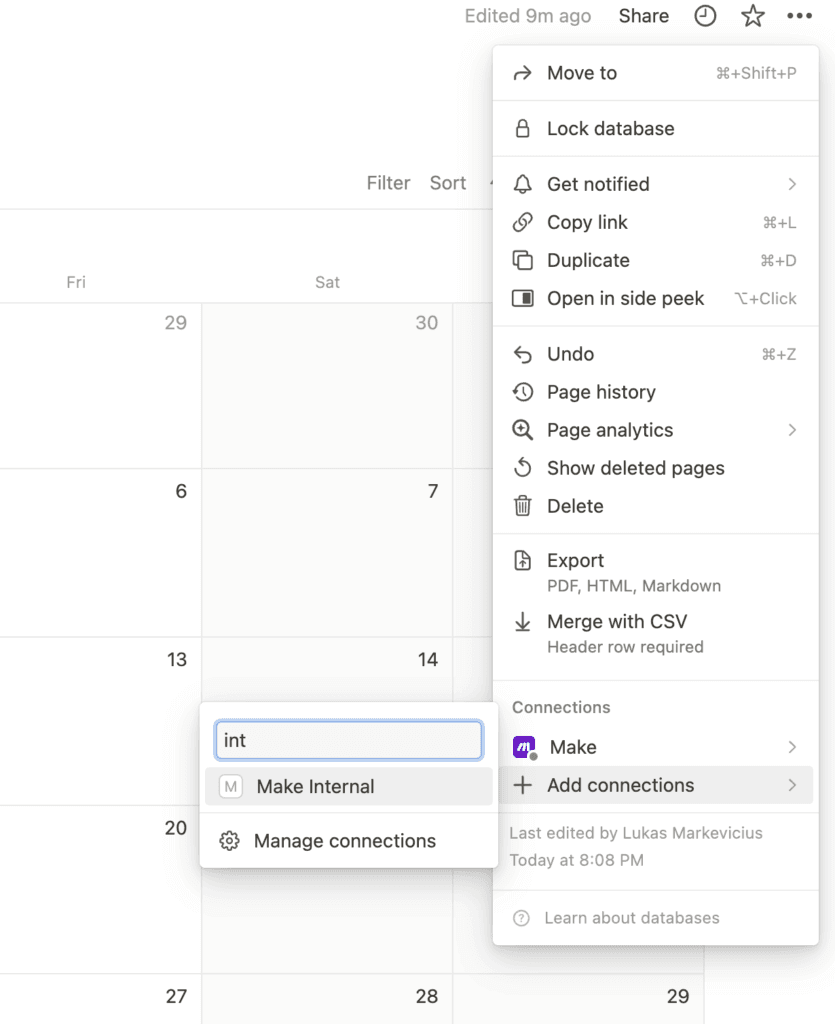
- In your Notion workspace, click the upper-right menu icon (three dots).
- Select “+ Add Connections” and search for your newly created integration.
- If it doesn’t appear, you may need to restart Notion.

Now that your Notion is prepared, let’s proceed with the integration using Make:
- Sign Up for Make:
- Go to the Make website and create an account (a free account is sufficient).
- Set Up Google Calendar Trigger:
- Once registered, create a new scenario.
- Add a trigger by searching for “Google Calendar” and selecting “Watch Events.”
- Connect your Google Calendar account and grant the necessary permissions.
- Configure the calendar you want to use and any additional settings.
- Configure Notion Action:
- Add another module and choose “Notion” -> “Create a Database Item.”
- Connect your Notion account, select the internal connection type, and provide your “Internal Integration Secret.”
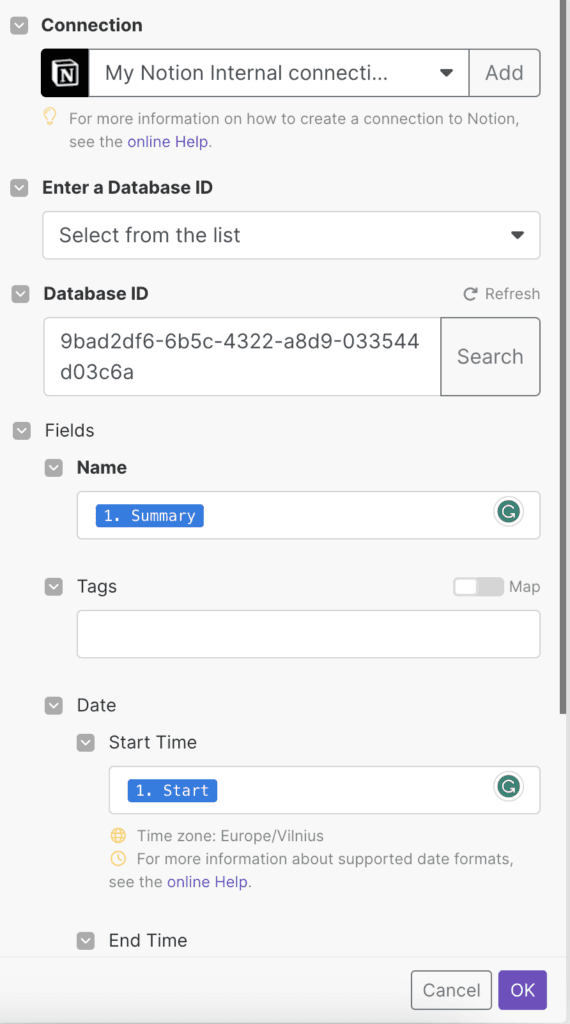
- When asked for the “Database ID,” choose “Select from the list” and click “Search.” If it doesn’t work, enter your database ID manually.
- Find your database ID by copying the part of the link between the last “/” and the first “?” symbol in your Notion database’s link.
- Back in Make, paste your Database ID, and it should display all available fields from your Notion.
- Map Fields and Confirm:
- Map the fields from your Google Calendar to the corresponding fields in Notion.
- Click “Ok” to confirm your mapping.

That’s it! You’ve successfully set up Google Calendar integration with Notion. To test it, you may need to create a new event in Google Calendar.
- Testing and Running the Automation:
- Go back to Make’s scenario builder and click “Run once” to trigger your workflow.
- If everything is set up correctly, you’ll see your newly created Google Event in your Notion calendar.
- Consistent Automation:
- To run this automation consistently, turn on the scheduling option in Make.
- You can choose different intervals for the automation to run, but the default 15-minute interval should suffice.
Congratulations! You’ve created a seamless integration between Google Calendar and Notion, streamlining your event management and boosting your productivity.
Automating Calendar Event Creation
Automating the creation of Google Calendar events from Notion entries can save time and reduce errors. Lucky for you, Make provides a template for a scenario to automate these tasks. Add this template Create Google Calendar events from Notion Database Items, follow the guidelines, and integrate this automation into your workflow.
Now, whenever you create a new entry in Notion using your event template, it will automatically generate an event in your Google Calendar.
Tips for Effective Google Calendar and Notion Workflow
Here are some tips for maximizing your Google Calendar and Notion integration:
- Consistency: Maintain consistent database structures and templates in Notion to streamline your workflow.
- Regular Sync: Ensure your chosen integration tool regularly syncs Notion and Google Calendar to prevent scheduling conflicts.
- Collaboration: Leverage Notion’s collaborative features for team calendars and shared events.
- Mobile Accessibility: Confirm that you can access both Notion and Google Calendar on mobile devices for on-the-go productivity.
- Backup: Regularly back up your Notion data and Google Calendar events to prevent data loss.
Conclusion
Incorporating Notion automations into your Google Calendar workflow can transform the way you manage your time. By simplifying scheduling, streamlining task management, and enhancing collaboration, this integration empowers you to make the most of every day.
Start harnessing the power of Notion automations for Google Calendar today and experience a more organized, efficient, and productive schedule.

